DORMOTION Done Right: Why the Adjustment Tool (and 5 mm Fork Gap) Matter
What DORMOTION Does — and Why Precision Matters
What Is DORMOTION?
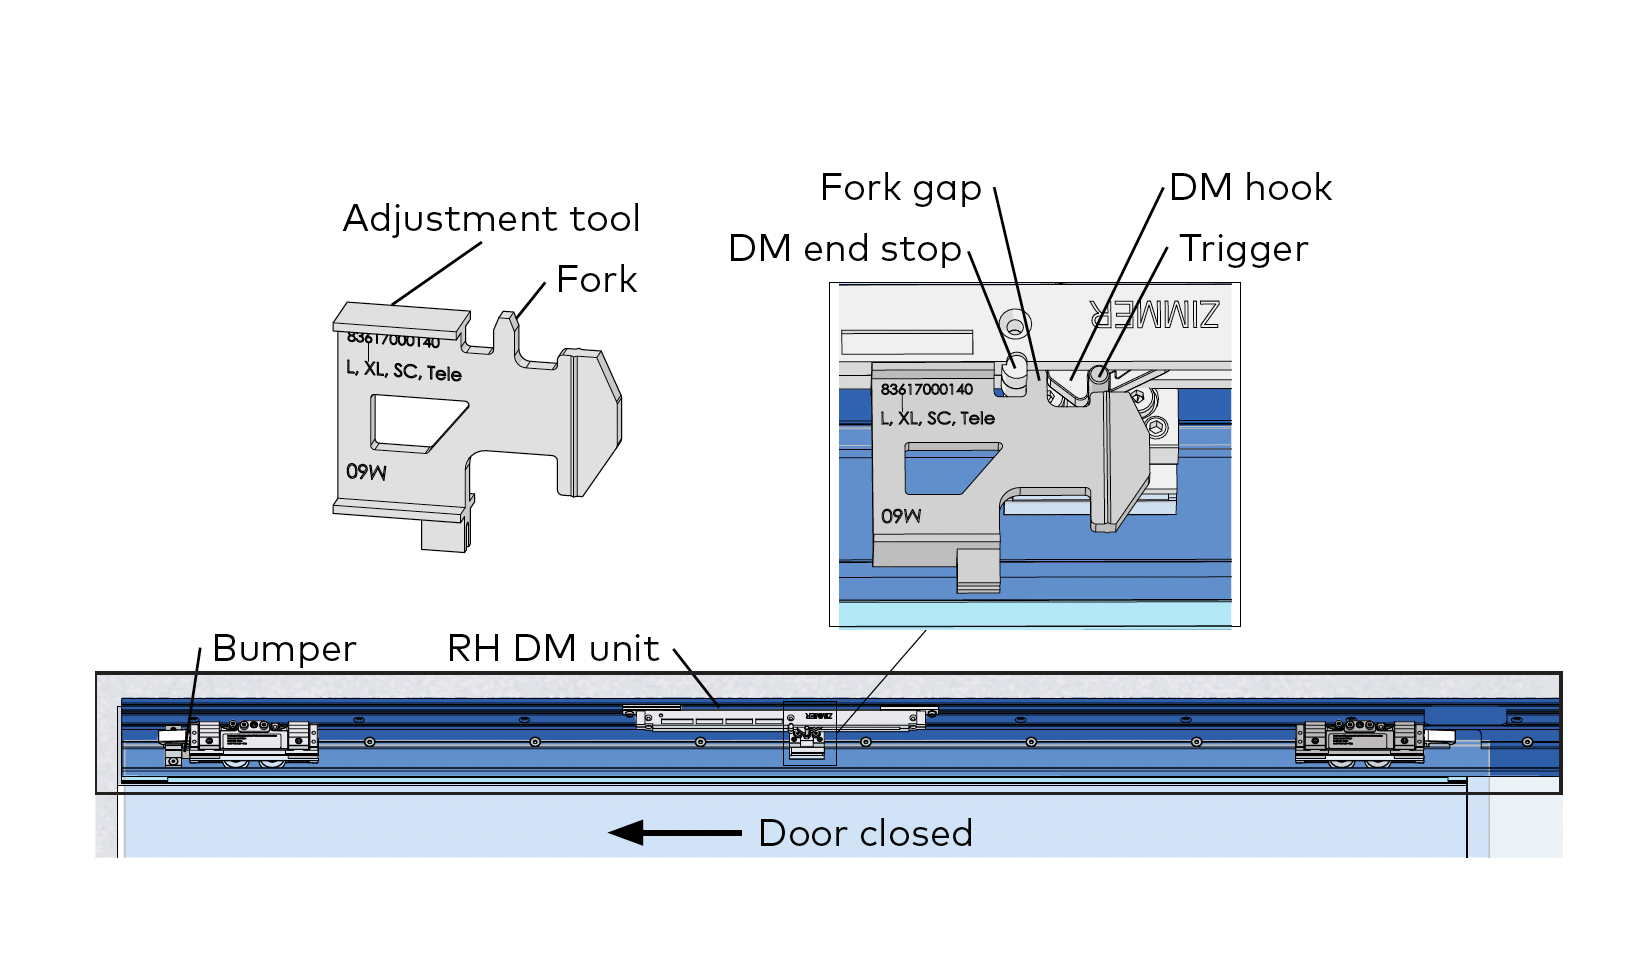
DORMOTION is the damping/assist module that catches the sliding door near the end of travel and guides it gently to rest. For reliable operation, the DM hook must engage the trigger at precisely the right spot—exactly 5 mm from the DM end stop, set using the manufacturer’s fork-style adjustment tool.
Why Precision Is Critical
Skipping or “tuning by feel” can cause harsh closing, bounce, or total loss of soft-close. At worst, an improperly set hook can chip or snap, leading to expensive service calls.
Common Installer Mistakes
-
Eyeballing end stop and hook alignment
-
Skipping the adjustment tool during final setup
-
Tightening fastening plates before confirming the 5 mm fork gap
-
Not keeping the door pressed to bumper while torquing
Any of these can cause DORMOTION to misfire, bind, or break over time.
Tools You’ll Need
-
4 mm hex key — fastening plate screws
-
3 mm hex key — start/stop pin adjustment
-
Forked adjustment tool — sets exact 5 mm gap
-
Torque spec: 3 ft-lb (4 Nm)
-
Keep door pressed to bumper (closed for RH, open for LH) while tightening
Step-by-Step: Setting Up DORMOTION
-
Prep the fastening plates
Loosen 4 mm hex screws, rotate plates parallel, slide DM unit inside track, and snug the screws. -
Position the door
-
RH unit → door fully closed against bumper
-
LH unit → door fully open against bumper
-
-
Engage the hook
Slide DM unit so hook fully engages trigger on roller carrier. -
Use the adjustment tool
Place forked tool against DM unit, fork between hook and end stop. Slide DM unit until both touch fork surfaces—sets precise 5 mm gap. Confirm trigger height—trigger should rest atop tool. If not, adjust per manual. -
Lock it down
With door pressed to bumper, tighten fastening plate screws to 4 Nm. Don’t move door until torque is complete. -
Verify start/stop pin height
Loosen 3 mm hex screws, adjust, retighten.
Quick Reference
-
RH Unit:
-
Door closed against bumper
-
Engage hook and trigger
-
Set 5 mm gap with fork tool
-
Confirm trigger height on tool
-
Torque screws to 4 Nm with door closed
-
-
LH Unit:
-
Door open against bumper
-
Engage hook and trigger
-
Set 5 mm gap with fork tool
-
Confirm trigger height on tool
-
Torque screws to 4 Nm with door open
-
Commissioning Checklist
☑ Fastening plates parallel, snug for sliding
☑ Door at correct bumper (Closed RH / Open LH)
☑ Hook engaged in trigger
☑ 5 mm fork tool gap confirmed
☑ Trigger height verified
☑ Fastening screws torqued at bumper
☑ Smooth capture and damping confirmed
Troubleshooting Fast
-
Hook misses trigger or pops out: Reset with fork tool, check trigger height, re-torque
-
Harsh stop / no damping: Gap is wrong, repeat fork tool step
-
Inconsistent panel behavior: Confirm door position and torque match
Pro Tips
-
Never tune by feel—precision geometry is critical
-
Keep door pressed to bumper while tightening
-
Record torque for consistency
-
Mirror the process for RH and LH units
Bottom Line
The MUTO DORMOTION system delivers a smooth, premium feel—when it’s adjusted exactly as designed. Always use the forked adjustment tool for the 5 mm gap and check trigger height before locking the unit. It only takes a minute, but it prevents broken hooks, callbacks, and costly replacements.
Explore the leading source for dormakaba MUTO sliding door hardware—discover products, resources, and expert insight at slidinghardware.com.